
How can we help you?


-
Orders / Payment
Make sure you are using either Chrome or Firefox. These browsers work best for our site. If you have any issues with payment, please check with your credit card company first and contact us directly.
-
Please check with your credit card company first. The most common issues are due to an expired card, exceeded credit limit, or authorization denial.
-
Click the invoice link in your Order Confirmation email to download your invoice.
-
Please check your order status & tracking information to check whether the items in your order have been shipped or delivered. If some of the items have not shipped yet or if you have not received all parts of your order despite a "Delivered" tracking status, please contact us via email and provide us with your order number & a photo of all the items that you have received. We’ll go ahead and assist you from there!
-
Please recheck the stated delivery location or anywhere your order may have been dropped off. We kindly ask you to check with your neighbors and other residents to see if they received the package for you. After you have confirmed that your package is missing, please contact us via email support.us@orangemonkie.com. We’ll file a claim for a missing package with the courier for you.
-
Please contact us via email support.us@orangemonkie.com ASAP with your order number and reason for cancellation. If your order has been shipped out, we will not be able to cancel your order. Once you receive all of your ordered items, please keep all items unopened and we will assist you with your return/refund process. If you order has not been shipped yet, we’ll go ahead and cancel your order & process your refund. *Please note that any returned items that are opened/used will be subjected to a restocking fee (15%).
-
Shipping
We ship to any country that is listed on the Checkout page.If you country is not listed, it is most likely due to customs issues. Please contact us directly if you have any questions regarding local resellers.
-
U.S. Orders: Usually shipped out via UPS, USPS, FedEx, or Amazon Logistics.
International Orders: Usually shipped out via express shipping couriers - DHL, TNT, EMS depending on the availability in your country.
-
You cannot specify a day for delivery. If you would like to expedite your order, please contact our support team BEFORE you place your order. If you already placed your order and the items have already been shipped, we will not be able to expedite your order.
-
Once your order has been shipped out, it’s difficult to change the shipping address. Please contact our support team ASAP and we will try to contact the courier to edit your shipping address.
-
Order processing takes 1~2 business days and the average delivery time is 1~4 business days. The actual date of delivery will depend on the area or country the items are being sent to. Please check if you have received a shipping confirmation email from us or check your order status/tracking number on your account dashboard.
-
You can track your order status on your account dashboard. If you didn’t create an account, please check your shipping confirmation email to track your order.
-
Since we only receive payment for products sold and shipping fees through this website, ORANGEMONKIE, INC. is not responsible for any customs, duties or import fees associated with receiving your order. All taxes and fees incurred after shipment are the customer’s responsibility. Please contact your local customs office directly for more information before ordering our products.
-
Returns/Exchanges/Warranty
We offer a 1 year warranty that covers your Orangemonkie products from any manufacturing flaws or defects. It does not cover any damages from misuse, accidents, or normal wear and tear.
- 1 Year Limited Warranty details:
- Within 30 days from the Purchase date : Warranted / Free shipping for Replacement
- Within 1 year from the Purchase date : Warranted / Shipping fee on customer side for Replacement
Orangemonkie, Inc. warrants to the consumer, the original purchaser, that the Product will, under normal use, operate substantially in accordance with the accompanying documentation, for a period of one (1) year from date of original purchase. The Consumer’s sole and exclusive remedy, and Orangemonkie, lnc.’s sole and exclusive responsibility under this warranty will be, at Orangemonkie, lnc.’s option, to replace the defective Product during the one (1) year limited warranty period so that it performs substantially in accordance with the accompanying documentation. Any replacements may be, at the option of Orangemonkie, lnc., a new or remanufactured Product. Any benefits to the Consumer given by this warranty are in addition to other rights and remedies that the Consumer may be entitled to under law.
What it generally does not cover:
The foregoing warranty is limited to the Product and is not applicable to: (i) consumables such as backdrops; (ii) normal wear and tear; (iii) defects or damage caused by misuse, accident (including without limitation: collision, fire and the spillage of food or liquid), neglect, abuse, alteration, unusual stress, modification, improper or unauthorized repair or improper storage; (iv) use not in accordance with the documentation; and (v) damage caused by or to the equipment with which the product is used.
Unauthorized resales are not supported by the manufacturer's warranty. If you purchased our product from an unauthorized dealer, the 1-year warranty (if ordinarily offered) does not apply and the item will not be eligible for product support from Orangemonkie, lnc.
Amazon
Purchases made via Amazon must be bought directly from our Amazon shop (Sold by Orangemonkie) to qualify for a warranty replacement.
How do I submit a warranty claim?
- To obtain warranty service for any product that is subject to the foregoing warranty, please contact us directly via email support.us@orangemonkie.com
- If you purchased directly from our site or Amazon shop, please provide your order number in the email. If you purchased from a verified reseller (such as B&H, Adorama, etc) please provide a copy of your receipt as an attachment in your email.
- We kindly ask you to send us any photos or videos of the issue that you are experiencing so we can analyze your issue better.
Certified Reseller Warranty
If you have purchased Orangemonkie products from one of our certified resellers outside of the US, please reach out to the reseller directly with your proof of purchase for any warranty claims.
-
We realize not everyone will be satisfied with their order.
If you are unsatisfied with your purchase from the Orangemonkie online shop for any reason, you have thirty (30) days from the date of purchase to request a return through our 30-Day Guarantee policy. We will gladly accept returns of an unworn/uncovered/unsealed/undamaged (not physically broken or damaged) product with all accessories in their original box/packaging within 30 days from purchase date for a refund, minus the cost of shipping, handling, taxes, and promotional discounts. The return shipping charges from the Customer to the Company will be that of the Customer.
If you wish to return an item, please check the cases below to see where you qualify and contact us via email.
Return cases
- Qualifies for: Repair or replacement (for products purchased directly from Orangemonkie within the last year.) For products purchased through a certified reseller, please contact them directly.
Case #1: Product has been damaged or is malfunctioning
How to complete:
- We kindly request a video or a photo of the issue, so please take a video/photo of the issue with your phone.
- Send your video/photo and your order number to our support email support.us@orangemonkie.com. Be sure to include details about the problem so we can assist you better.
- Qualifies for: Full refund
Case #2: Order was placed but has not yet shipped
How to complete:
- Send us an email ASAP with your order number to the support email support.us@orangemonkie.com.
- Qualifies for: Full refund, minus the cost of return shipping
Case #3: You received the shipment but have not opened the product and you contacted us with your return request within 30 days from the date of purchase.
How to complete:
- Send an email to the support email support.us@orangemonkie.com and make sure to include your order number.
- Qualifies for: Refund minus return shipping fee and restocking fee (15% of purchase value)
- Example: You purchased a Foldio1 ($29) from our shop website. You tried the product once and found that it’s not what you were looking for. You requested a return within 30 days from the date of purchase. Once we receive your return shipment, we will be refunding you your full refund minus the return shipping cost & the restocking fee for the Foldio1 ($4.35).
Case #4: You received the shipment and opened/used the products. You contacted us with your return request within 30 days from the date of purchase.
How to complete:
- Send an email to the support email support.us@orangemonkie.com and make sure to include your order number.
Non-returnable Items
Note that the return policy is not applicable to:
- Items purchased (ordered date on invoice) more than 30 days ago
- (i) normal wear and tear; (ii) defects or damage caused by misuse, incorrect or abusive use, accidents (including without limitation; collision, fire and the spillage of food or liquid), neglect, abuse, alterations, unusual stress, modification, improper or unauthorized repair or improper storage. / Backdrops are not covered by the returns policy since they are considered as consumables.
Return shipments
Please note that items are your responsibility before they reach our office. We kindly advise you to securely package the items in bubble wrap and send them in a padded/secure box to prevent damage. We are not responsible for lost packages nor are we responsible for the cost of returning an item.
Exchanges
We generally don’t accept exchanges of products without appropriate reasons by mutual agreement between both Orangemonkie and Customers. We can only accept exchanges of an originally defective product (not physically broken or damaged) with all accessories and in its original box/packaging within 30 days from the purchase date.
If you received a defective product that exhibits damage not associated with normal wear, please contact us via email (within 30 days from purchase date) with your order number and we will be happy to assist you with your return shipping & send your replacement to you at no cost.
If you have any questions about returns or exchanges, please contact us directly via email support.us@orangemonkie.com with your order number and reason for your request.
-
Please contact our support team via email support.us@orangemonkie.com and let us know what issues you are facing ASAP so we can assist you to the best of our ability. We kindly ask you to send us any appropriate images or videos that may help us understand the issue better.
-
Yes - if you are eligible for return (within 30 days after purchase date). Please contact us via email support.us@orangemonkie.com with your order number, item/s that you would like to return, and reason for your return request.
-
You have 30 days from the purchase date to return.
-
You will receive a prepaid return label via email once your return request has been accepted. Returns usually take 3-5 business (depending on your location) to reach our office. After we confirm the delivery of the returns, refunds are processed within 2-3 business days.
-
If there is an issue (manufacturing flaws or defects) with your product, you are still eligible for the 1 year warranty. Please contact us directly via email with your order number and a short description of the issue. If you made a mistake with your order and would like to exchange for another product, please contact us directly via email as well. You will be charged for the return shipping cost & may be charged with a restocking fee depending on the condition (opened/used) of the item you are returning.
-
Photo Studios
Foldio1 - 10" Foldable All-In One Photo Studio
-
-
-
Please check what replacement part is needed and purchase it from the Spare Parts. If you are unsure what part you need to purchase, please contact us.
-
Please contact us directly with your order number and a short explanation of the issue.
-
Foldio2 Plus - 15" Foldable All-In One Photo Studio
-
-
The Foldio2 is an older, discontinued version of the Foldio2 Plus. The Foldio2 is no longer available.
Foldio2 Plus Upgrades:
- Dual LED system → Triple LED system
- Magnetic Top cover installed
- Compatible with Halo Bars (Magnetic lighting accessory)
- Compatible with the Magnetic Front Cover
-
-
You can attach the Halo Bars to the magnetic parts of the Foldio2 Plus or place them at any location you want.
-
The backdrop holders are attached magnetically to the inside of the Foldio2 Plus. Please thoroughly check your Foldio2 Plus & the package box before contacting us.
-
Please contact us directly support.us@orangemonkie.com with your order number and a short explanation of the issue. We kindly ask you to send us any appropriate images or videos that may help us understand the issue better.
-
Please check what replacement part is needed and purchase it from the Spare Parts. If you are unsure what part you need to purchase, please contact us.
-
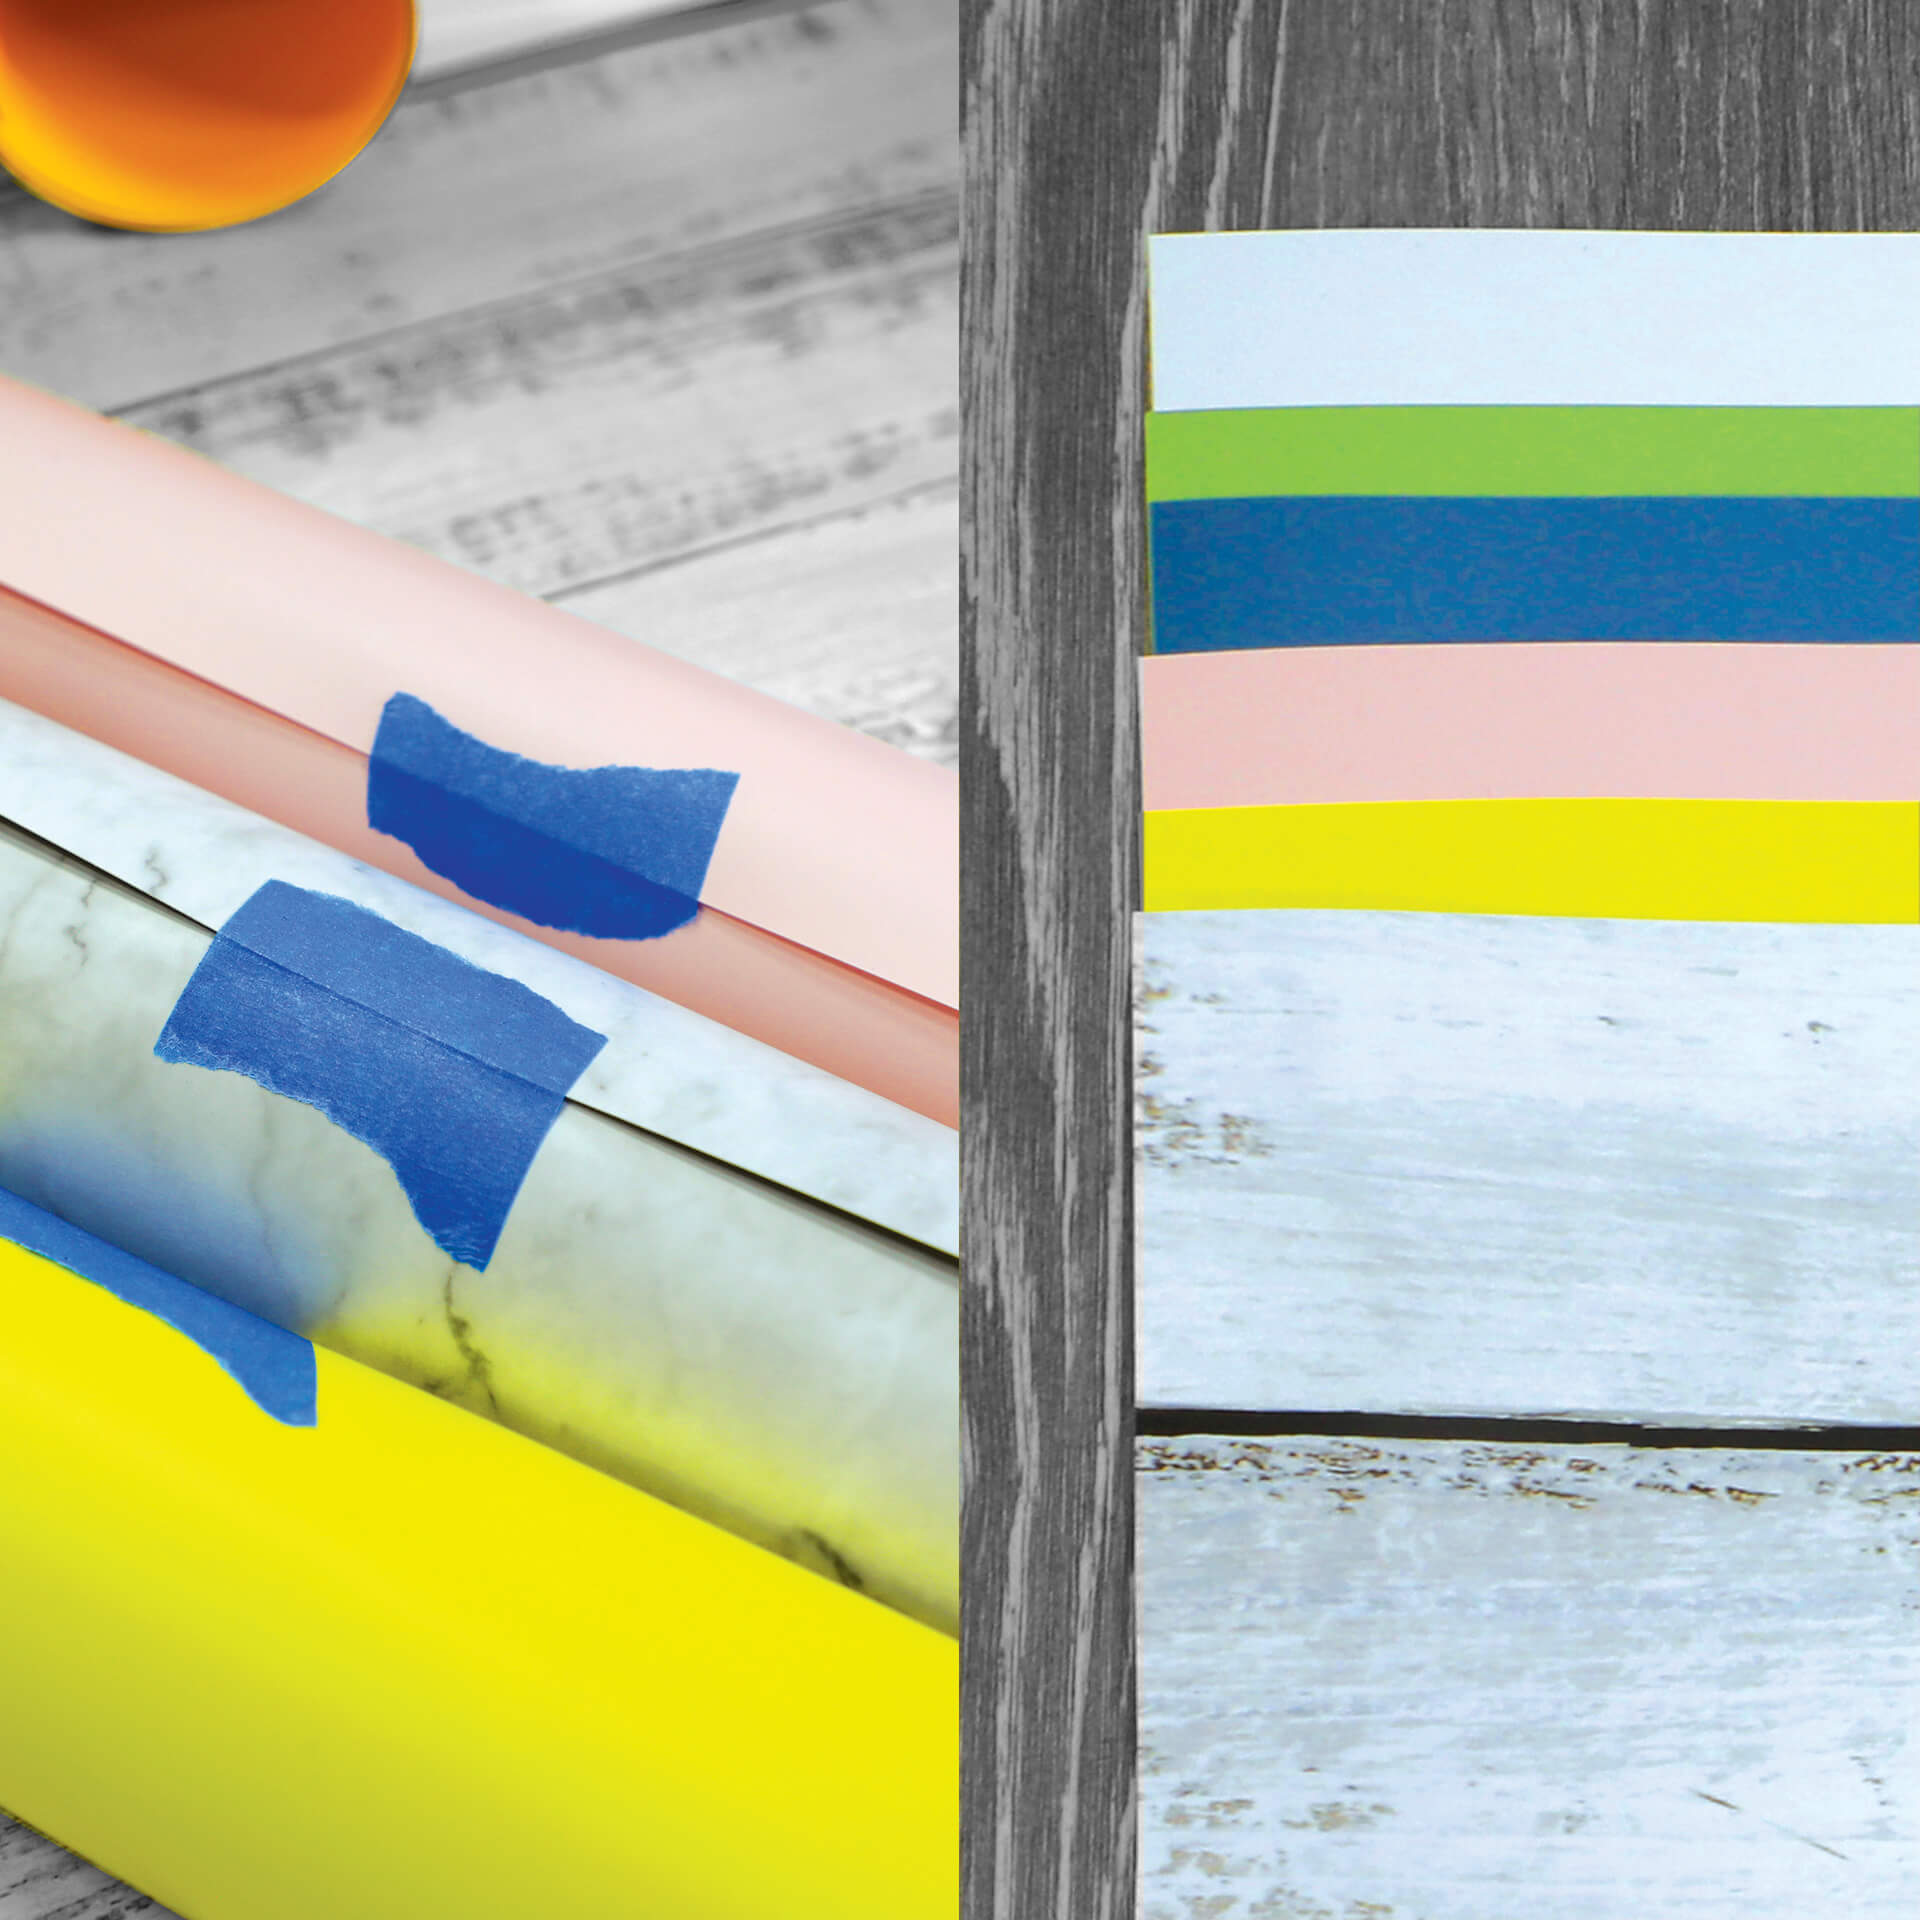
1. Loosely Roll the backdrops in the opposite direction of how it originally was packaged.
2. Leave for an hour and it should become flat. (DO NOT leave for more than an hour)
-
Foldio3- 25" Foldable All-In One Photo Studio
-
-
-
-
You can attach the Halo Bars to the magnetic parts of the Foldio3 or place them at any location you want.
-
No. Unfortunately, we don’t offer a front cover for the Foldio3, only for the Foldio2 Plus.
-
Just flip your Foldio3 to make the back become the new bottom like this.

-
Please contact us directly at support.us@orangemonkie.com with your order number and a short explanation of the issue. We kindly ask you to send us any appropriate images or videos that may help us understand the issue better.
-
Please check what replacement part is needed and purchase it from the Spare Parts. If you are unsure what part you need to purchase, please contact us.
-
1. Loosely Roll the backdrops in the opposite direction of how it originally was packaged.
2. Leave for an hour and it should become flat. (DO NOT leave for more than an hour)
-
Halo Bars
Yes, you can use two sets, but since the dimmer controller (that comes with the Foldio studio) can only be used with one set of Halo Bars, you will need to purchase the Halo Bar Kit (Adapter Kit & a dimmer included) for your second set. If you have already purchased the Halo Bars (not Kit) as your second set, don’t worry. You can purchase the Halo Bar Adapter Kit & Dimming Controller from the Spare Parts page.
-
The Halo Bar Kit includes the adapter & dimmer so you can use them on their own, without a compatible Foldio studio, or as a second set of additional lighting. If you already own a Foldio2 Plus or a Foldio3 studio and you wish to add extra lighting, you can purchase the Halo Bars (not Kit) and plug them into the same dimmer that comes with the studio.
-
You can attach the Halo Bars to the magnetic parts of the studio or place them at any location you want.
-
Please contact us via email with your order number and a video of the issue.
-
Either your Halo Bars, y-cable, or the dimmer may have an issue. Please follow the below troubleshooting guide first before contacting us:
One of my Halo Bars is not working - troubleshooting guide:
- Check that your studio LED light is working properly using the dimmer
- Switch the y-cable between the Halo Bar units to check if the unit with the issue lights up.
- If the unit that did not work before lights up → y-cable issue
- If the unit still does not light up → the issue is in that unit
- Please contact us with your order number & video of the previous step so we can assist you accordingly.
Both of my Halo Bars are not working - troubleshooting guide:
- Check that your studio LED light is working properly using the dimmer
- Remove the y-cable from the Halo Bars. Plug the dimmer (make sure it’s connected to the power adapter) into each Halo Bar unit where the y-cable is supposed to be plugged in. Check whether each of the Halo Bar units light up.
- If both Halo Bar units do not light up, both units are defective
- If the Halo Bars light up when using the dimmer, the issue may by in the y-cable or dimmer (y-cable port)
- Please contact us with your order number & video of the previous step so we can assist you accordingly.
-
Please check what replacement part is needed and purchase it from the Spare Parts. If you are unsure what part you need to purchase, please contact us.
-
360° Studios
Foldio360 Smart Turntable - Effortlessly Create 360° Visuals
-
Foldio360 can support up to 11 lbs (5 kg).
-
[iPhone]
OS version: iOS 10.0 or higher
Supported devices:
- iPhone 13
- iPhone 13 mini
- iPhone 13 Pro
- iPhone 13 Pro Max
- iPhone 12
- iPhone 12 mini
- iPhone 12 Pro
- iPhone 12 Pro Max
- iPhone 11
- iPhone 11 Pro
- iPhone 11 Pro Max
- iPhone XS
- iPhone XS Max
- iPhone XR
- iPhone X
- iPhone 8
- iPhone 8 Plus
- iPhone 7
- iPhone 7 Plus
- iPhone 6s
- iPhone 6s Plus
- iPad, iPod touch, Mac (M1 chip): This application is not guaranteed to operate on these devices.
[Android]
Android version: android 10.0 or higher
*Note: Android devices launched in the past 2 years that meet android version requirement should be compatible with the app.
-
What is the Halo Edge light? The Halo Edge light enhances the quality of your 360° images by eliminating any boundary lines. Make sure the Halo Edge light is facing the backdrop, not the camera. In order to control the Halo Edge Light, connect your turntable to the foldio360 app and adjust the slider.

-
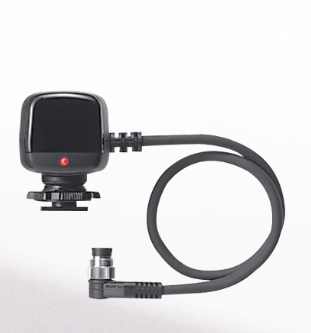
This is the DSLR camera compatibility list for Foldio360 Smart Turntable & Foldio360 Smart Dome we tested so far.
We will keep updating the camera list.
Please let us know if your camera do work or doesn't work to update the list.
Compatible Cameras: Cameras equipped IR receiver, but for these brands only:
CANON, NIKON, SONY, PENTAXIf you have any issues or have questions regarding the compatibility, please contact us at: support.us@orangemonkie.com
[Remote mode setting on the DSLR camera]
This is general remote setting way. It can be different depending on models. Please refer to the camera manufacturer website for the details.
• CANON: Menu - Drive mode - Remote mode select
• NIKON: Menu - Drive mode - Remote mode select
• SONY: Menu - Drive mode - Remote mode select Menu - Tool box - Remote ctrl ON (Alpha a7II, Alpha a7R and etc.)
• PENTAX: Menu - Drive mode - Remote mode select
[DSLR camera compatibility table]
Brand Product Compatibility Description CANON EOS 100D O - CANON EOS 350D O - CANON EOS 400D O - CANON EOS 450D O - CANON EOS 500D O - CANON EOS 550D O - CANON EOS 5D Mark II O - CANON EOS 5D Mark IIl O - CANON EOS 5D Mark IV O - CANON EOS 5Ds O - CANON EOS 5Ds R O - CANON EOS 600D O - CANON EOS 60D O - CANON EOS 60Da O - CANON EOS 650D O - CANON EOS 6D O - CANON EOS 6D Mark ll O - CANON EOS 700D O - CANON EOS 70D O - CANON EOS 750D O - CANON EOS 760D O - CANON EOS 77D O - CANON EOS 7D O - CANON EOS 7D Mark II O - CANON EOS 80D O - CANON EOS 800D O - CANON EOS 90D O - CANON EOS M3 O - CANON EOS M5 O - CANON EOS M6 O - CANON EOS R5 O - CANON EOS R6 O - CANON EOS Rebel SL1 O - CANON EOS Rebel T1i O - CANON EOS Rebel T3i O - CANON EOS Rebel T4i O - CANON EOS Rebel T5i O - CANON EOS Rebel T6i O - CANON EOS Rebel T6s O - CANON EOS Rebel T7i O - CANON EOS Rebel XSi (450D) O - CANON EOS Rebel T2i O - NIKON COOLPIX A O - NIKON COOLPIX P6000 O - NIKON COOLPIX P7000 O - NIKON COOLPIX P7100 O - NIKON COOLPIX P7700 O - NIKON COOLPIX P7800 O - NIKON COOLPIX P900 O - NIKON D200 O Require Nikon ML-3 Compact Modulite Remote set NIKON D2H O Require Nikon ML-3 Compact Modulite Remote set NIKON D2Hs O Require Nikon ML-3 Compact Modulite Remote set NIKON D2X O Require Nikon ML-3 Compact Modulite Remote set NIKON D2Xs O Require Nikon ML-3 Compact Modulite Remote set NIKON D3 O Require Nikon ML-3 Compact Modulite Remote set NIKON D300 O Require Nikon ML-3 Compact Modulite Remote set NIKON D300S O Require Nikon ML-3 Compact Modulite Remote set NIKON D3000 O - NIKON D3200 O - NIKON D3300 O - NIKON D3400 O - NIKON D3S O Require Nikon ML-3 Compact Modulite Remote set NIKON D3X O Require Nikon ML-3 Compact Modulite Remote set NIKON D40 O - NIKON D4 O Require Nikon ML-3 Compact Modulite Remote set NIKON D4S O Require Nikon ML-3 Compact Modulite Remote set NIKON D5 O Require Nikon ML-3 Compact Modulite Remote set NIKON D50 O - NIKON D500 O Require Nikon ML-3 Compact Modulite Remote set NIKON D5000 O - NIKON D5100 O - NIKON D5200 O - NIKON D5300 O - NIKON D5500 O - NIKON D6 O Require Nikon ML-3 Compact Modulate Remote Set NIKON D60 O - NIKON D610 O - NIKON D600 O - NIKON D70 O - NIKON D700 O Require Nikon ML-3 Compact Modulite Remote set NIKON D7000 O - NIKON D70S O - NIKON D7100 O - NIKON D7200 O - NIKON D750 O - NIKON D7500 O - NIKON D80 O - NIKON D800 O Require Nikon ML-3 Compact Modulite Remote set NIKON D800E O Require Nikon ML-3 Compact Modulite Remote set NIKON D810 O Require Nikon ML-3 Compact Modulite Remote set NIKON D810A O Require Nikon ML-3 Compact Modulite Remote set NIKON D850 O Require Nikon ML-3 Compact Modulite Remote set NIKON D90 O - NIKON 1 J1 O - NIKON 1 J2 O - NIKON 1 V1 O - NIKON 1 V2 O - NIKON 1 V3 O - SONY Alpha a230 O - SONY Alpha a290 O - SONY Alpha a33 O - SONY Alpha a330 O - SONY Alpha a380 O - SONY Alpha a390 O - SONY Alpha a450 O - SONY Alpha a500 O - SONY Alpha a55 O - SONY Alpha a550 O - SONY Alpha a57 O - SONY Alpha a560 O - SONY Alpha a580 O - SONY Alpha a6000 O - SONY Alpha a6300 O - SONY Alpha a6500 O - SONY Alpha a65 O - SONY Alpha a7 O - SONY Alpha a7 III O - SONY Alpha a7S O - SONY Alpha a7R II O - SONY Alpha a7S III O - SONY Alpha a77 II O - SONY Alpha a700 O - SONY Alpha a77 O - SONY Alpha a7II O - SONY Alpha a7R O - SONY Alpha a7RIII O - SONY Alpha a7S ll O - SONY Alpha a850 O - SONY Alpha a9 O - SONY Alpha a9 II O - SONY Alpha a99 O - SONY Alpha a99 II O - SONY Alpha a900 O - SONY Alpha NEX-5 O - SONY Alpha NEX-5N O - SONY Alpha NEX-5R O - SONY Alpha NEX-5T O - SONY Alpha NEX-6 O - SONY Alpha NEX-7 O - SONY Alpha SLT-A65 O - PENTAX 645D O - PENTAX 645Z O - PENTAX K-1 O - PENTAX K-1 II O - PENTAX K100D O - PENTAX K-3 O - PENTAX K-3 II O - PENTAX K-3 III O - PENTAX K-30 O - PENTAX K-5 II O - PENTAX K-5 IIs O - PENTAX K-50 O - PENTAX K-70 O - PENTAX K-S1 O - PENTAX K-S2 O - PENTAX X-5 O - PENTAX X90 O - PENTAX Optio VS20 O - *Nikon ML-3 Compact Modulite Remote
-
You can take photos or videos manually if your camera is not on the Foldio360 Smart Turntable compatibility list or doesn’t have the IR remote mode.
Photo taking with DSLR (Incompatible)
DSLR video mode
-
Both! Go to the Turntable control mode and select however many degrees you want to rotate the turntable clockwise or counterclockwise. To rotate it continuously, go to the Turntable control mode and set the number of rotation to the infinity sign.

You can also turn on the display mode by pressing on the button next to the adapter input port for 5 seconds. The turntable will now rotate continuously. Press the button for 5 seconds to turn off the display mode.

-
Both! You can turn the turntable clockwise or counterclockwise by pressing the Left & Right button. When shooting 360 photos & videos through the app, the turntable will only rotate clockwise.
-
Please contact us at support.us@orangemonkie.com directly with your order number and a short explanation of the issue. We kindly ask you to send us any appropriate images or videos that may help us understand the issue better.
-
Please check what replacement part is needed and purchase it from the Spare Parts. If you are unsure what part you need to purchase, please contact us.
-
Foldio360 Smart Dome - Shoot Studio Quality 360° Product Photography
-
-
This is the DSLR camera compatibility list for Foldio360 Smart Turntable & Foldio360 Smart Dome we tested so far.
We will keep updating the camera list.
Please let us know if your camera do work or doesn't work to update the list.
Compatible Cameras: Cameras equipped IR receiver, but for these brands only:
CANON, NIKON, SONY, PENTAXIf you have any issues or have questions regarding the compatibility, please contact us at: support.us@orangemonkie.com
[Remote mode setting on the DSLR camera]
This is general remote setting way. It can be different depending on models. Please refer to the camera manufacturer website for the details.
• CANON: Menu - Drive mode - Remote mode select
• NIKON: Menu - Drive mode - Remote mode select
• SONY: Menu - Drive mode - Remote mode select Menu - Tool box - Remote ctrl ON (Alpha a7II, Alpha a7R and etc.)
• PENTAX: Menu - Drive mode - Remote mode select
[DSLR camera compatibility table]
Brand Product Compatibility Description CANON EOS 100D O - CANON EOS 350D O - CANON EOS 400D O - CANON EOS 450D O - CANON EOS 500D O - CANON EOS 550D O - CANON EOS 5D Mark II O - CANON EOS 5D Mark IIl O - CANON EOS 5D Mark IV O - CANON EOS 5Ds O - CANON EOS 5Ds R O - CANON EOS 600D O - CANON EOS 60D O - CANON EOS 60Da O - CANON EOS 650D O - CANON EOS 6D O - CANON EOS 6D Mark ll O - CANON EOS 700D O - CANON EOS 70D O - CANON EOS 750D O - CANON EOS 760D O - CANON EOS 77D O - CANON EOS 7D O - CANON EOS 7D Mark II O - CANON EOS 80D O - CANON EOS 800D O - CANON EOS 90D O - CANON EOS M3 O - CANON EOS M5 O - CANON EOS M6 O - CANON EOS R5 O - CANON EOS R6 O - CANON EOS Rebel SL1 O - CANON EOS Rebel T1i O - CANON EOS Rebel T3i O - CANON EOS Rebel T4i O - CANON EOS Rebel T5i O - CANON EOS Rebel T6i O - CANON EOS Rebel T6s O - CANON EOS Rebel T7i O - CANON EOS Rebel XSi (450D) O - CANON EOS Rebel T2i O - NIKON COOLPIX A O - NIKON COOLPIX P6000 O - NIKON COOLPIX P7000 O - NIKON COOLPIX P7100 O - NIKON COOLPIX P7700 O - NIKON COOLPIX P7800 O - NIKON COOLPIX P900 O - NIKON D200 O Require Nikon ML-3 Compact Modulite Remote set NIKON D2H O Require Nikon ML-3 Compact Modulite Remote set NIKON D2Hs O Require Nikon ML-3 Compact Modulite Remote set NIKON D2X O Require Nikon ML-3 Compact Modulite Remote set NIKON D2Xs O Require Nikon ML-3 Compact Modulite Remote set NIKON D3 O Require Nikon ML-3 Compact Modulite Remote set NIKON D300 O Require Nikon ML-3 Compact Modulite Remote set NIKON D300S O Require Nikon ML-3 Compact Modulite Remote set NIKON D3000 O - NIKON D3200 O - NIKON D3300 O - NIKON D3400 O - NIKON D3S O Require Nikon ML-3 Compact Modulite Remote set NIKON D3X O Require Nikon ML-3 Compact Modulite Remote set NIKON D40 O - NIKON D4 O Require Nikon ML-3 Compact Modulite Remote set NIKON D4S O Require Nikon ML-3 Compact Modulite Remote set NIKON D5 O Require Nikon ML-3 Compact Modulite Remote set NIKON D50 O - NIKON D500 O Require Nikon ML-3 Compact Modulite Remote set NIKON D5000 O - NIKON D5100 O - NIKON D5200 O - NIKON D5300 O - NIKON D5500 O - NIKON D6 O Require Nikon ML-3 Compact Modulate Remote Set NIKON D60 O - NIKON D610 O - NIKON D600 O - NIKON D70 O - NIKON D700 O Require Nikon ML-3 Compact Modulite Remote set NIKON D7000 O - NIKON D70S O - NIKON D7100 O - NIKON D7200 O - NIKON D750 O - NIKON D7500 O - NIKON D80 O - NIKON D800 O Require Nikon ML-3 Compact Modulite Remote set NIKON D800E O Require Nikon ML-3 Compact Modulite Remote set NIKON D810 O Require Nikon ML-3 Compact Modulite Remote set NIKON D810A O Require Nikon ML-3 Compact Modulite Remote set NIKON D850 O Require Nikon ML-3 Compact Modulite Remote set NIKON D90 O - NIKON 1 J1 O - NIKON 1 J2 O - NIKON 1 V1 O - NIKON 1 V2 O - NIKON 1 V3 O - SONY Alpha a230 O - SONY Alpha a290 O - SONY Alpha a33 O - SONY Alpha a330 O - SONY Alpha a380 O - SONY Alpha a390 O - SONY Alpha a450 O - SONY Alpha a500 O - SONY Alpha a55 O - SONY Alpha a550 O - SONY Alpha a57 O - SONY Alpha a560 O - SONY Alpha a580 O - SONY Alpha a6000 O - SONY Alpha a6300 O - SONY Alpha a6500 O - SONY Alpha a65 O - SONY Alpha a7 O - SONY Alpha a7 III O - SONY Alpha a7S O - SONY Alpha a7R II O - SONY Alpha a7S III O - SONY Alpha a77 II O - SONY Alpha a700 O - SONY Alpha a77 O - SONY Alpha a7II O - SONY Alpha a7R O - SONY Alpha a7RIII O - SONY Alpha a7S ll O - SONY Alpha a850 O - SONY Alpha a9 O - SONY Alpha a9 II O - SONY Alpha a99 O - SONY Alpha a99 II O - SONY Alpha a900 O - SONY Alpha NEX-5 O - SONY Alpha NEX-5N O - SONY Alpha NEX-5R O - SONY Alpha NEX-5T O - SONY Alpha NEX-6 O - SONY Alpha NEX-7 O - SONY Alpha SLT-A65 O - PENTAX 645D O - PENTAX 645Z O - PENTAX K-1 O - PENTAX K-1 II O - PENTAX K100D O - PENTAX K-3 O - PENTAX K-3 II O - PENTAX K-3 III O - PENTAX K-30 O - PENTAX K-5 II O - PENTAX K-5 IIs O - PENTAX K-50 O - PENTAX K-70 O - PENTAX K-S1 O - PENTAX K-S2 O - PENTAX X-5 O - PENTAX X90 O - PENTAX Optio VS20 O - *Nikon ML-3 Compact Modulite Remote
-
The turntable can support up to 6 lbs (2.8 kg)
-
The recommend object size is: Up to 6” x 6” x 6” (15.2 x 15.2 x 15.2 cm)
-
To turn it on, plug in the adapter to a power source and connect device to the foldio360 app. Control the Smart Dome’s brightness, color temperature, and turntable through the app.
To turn off the Smart Dome, unplug the device entirely or lower the brightness through the app.
-
Color temperature: 2300k ~ 5600k Daylight
Brightness: 95+ CRI; 0.2 W High Density
-
The center point indicator shows where exactly you should place your object on the turntable to make sure it's centered for your 360 photography.
Tips: lower the Smart Dome’s brightness through the app before selecting the center point indicator so it’s more visible. Turn off the indicator after you placed your object & raise the brightness again.
-
Setting your Smart Dome to the display mode allows the turntable to rotate continuously. This mode is perfect for displaying your products for a long period of time.
How to turn on display mode: Press the black button located on the back of the Smart Dome where the adapter input port is located for 5 seconds. Press the button for 5 seconds again to turn the mode off.
-
Please contact us directly with your order number and a short explanation of the issue. We kindly ask you to send us any appropriate images or videos that may help us understand the issue better.
-
Please check what replacement part is needed and contact us directly.
-
Extension Plate
The Extension Plate comes with the following: 1x Extension plate, 1x Reflector plate, 1x Extension Backdrop. *Foldio360 Smart Turntable NOT included.
-
The purpose of the Extension Plate is to quadruple the surface area of the Foldio360. If you are shooting bigger items, utilize the extension plate with the horizontal backdrop to create a wider, seamless white background for your photos. Please note that the extension plate will rotate with the turntable.
-
-
The Extension Plate provides a mirrored reflector plate to ensure your DSLR pairing for seamless automatic 360 shooting. Make sure to position the reflective side upwards and place it in front of the turntable where the IR transmitter (blue flashing light) is located. The IR signal will now be able to bounce off the reflector plate and reach your DSLR.

-
We designed a horizontal backdrop that you can magnetically attach to the Foldio3 when using the Extension Plate. This backdrop will allow you to create a wider, seamless white background for your 360 photography.
-
The Extension plate is compatible with the Foldio360 Smart Turntable. Please note that the Extension plate will not fit inside the Foldio2 Plus studio and the Extension backdrop is compatible only with the Foldio3 studio.
-
Spare Parts
Please check our Spare Parts page. If you are not sure which part you need to purchase, please feel free to contact us!
-
No worries! You may have an older, discontinued version of a studio or need a very specific part of the product. Please contact us & let us know what you are looking for and we’ll check if the part is available for purchase.
-
foldio360 Application
The foldio360 app can be downloaded here:


-
You can upgrade the app to the Pro version with the in-app purchase of $2.99 (one time fee). In the Pro version, you can access the background filter and higher resolution options. If you purchased the upgrade but you can’t access the Pro version features, please go to app settings → click "Restore purchase"
-
Foldio360 uses BT4.0/BLE technology to connect to your smartphone without pairing. Please check the following information to make sure your smartphone is compatible with the Foldio360:
[iPhone] OS version: iOS 10.0 or higher
[Android] Android version: android 10.0 or higher
Your smartphone must also support bluetooth LE version. You can visit this link to get the bluetooth information of your smartphone (https://www.gsmarena.com/)
Please make sure that your Foldio360 or Foldio360 Smart Dome is plugged in correctly and your bluetooth is on before connecting to the app. Check your phone settings and make sure your location services is on and that you have allowed the foldio360 app to access bluetooth as well.
-
Since the iPad is not 100% compatible with the foldio360 app, there are some limitations to the use, such as exporting, quick upload, and etc. Please use a smartphone to use the foldio360 app.
-
- Mode 1 - Single Shot: Take still shots using the app with 1:1 or 3:4 ratio. Foldio360 turntable or Foldio360 Smart Dome connection not needed for this mode.
- Mode 2 - Phone 360: Place your object on the turntable, set the speed and number of frames (24, 36, or 48), and press the red button to shoot. The turntable will rotate and stop to shoot automatically until the full rotation is complete.
- Mode 3 - DSLR 360: Make sure your compatible DSLR camera is on remote mode (2-sec delay mode, etc). Select the brand (CANON, NIKON, PENTAX, SONY) and click the “Connection test” to test the IR connection between your DSLR camera and Foldio360 turntable. If your camera makes a sound and takes a photo, you’re all good to go! Select the turntable speed & number of frames and press the red button to shoot. Your DSLR will automatically take photos while the turntable rotates and stops on its own.
- Mode 4 - Video 360: Place you object on the turntable, stabilize your phone with a tripod/mount, select the number of rotation & speed, and press the red button to shoot!
- Mode 5 - Turntable control: You can control the turntable manually in this mode. You can rotate the turntable however many degrees you want clockwise or counterclockwise. You can set the speed for the turntable and have it rotate once or infinite times (continuous). This mode is perfect for users who want to shoot with their phone’s native camera app or an incompatible DSLR.
-
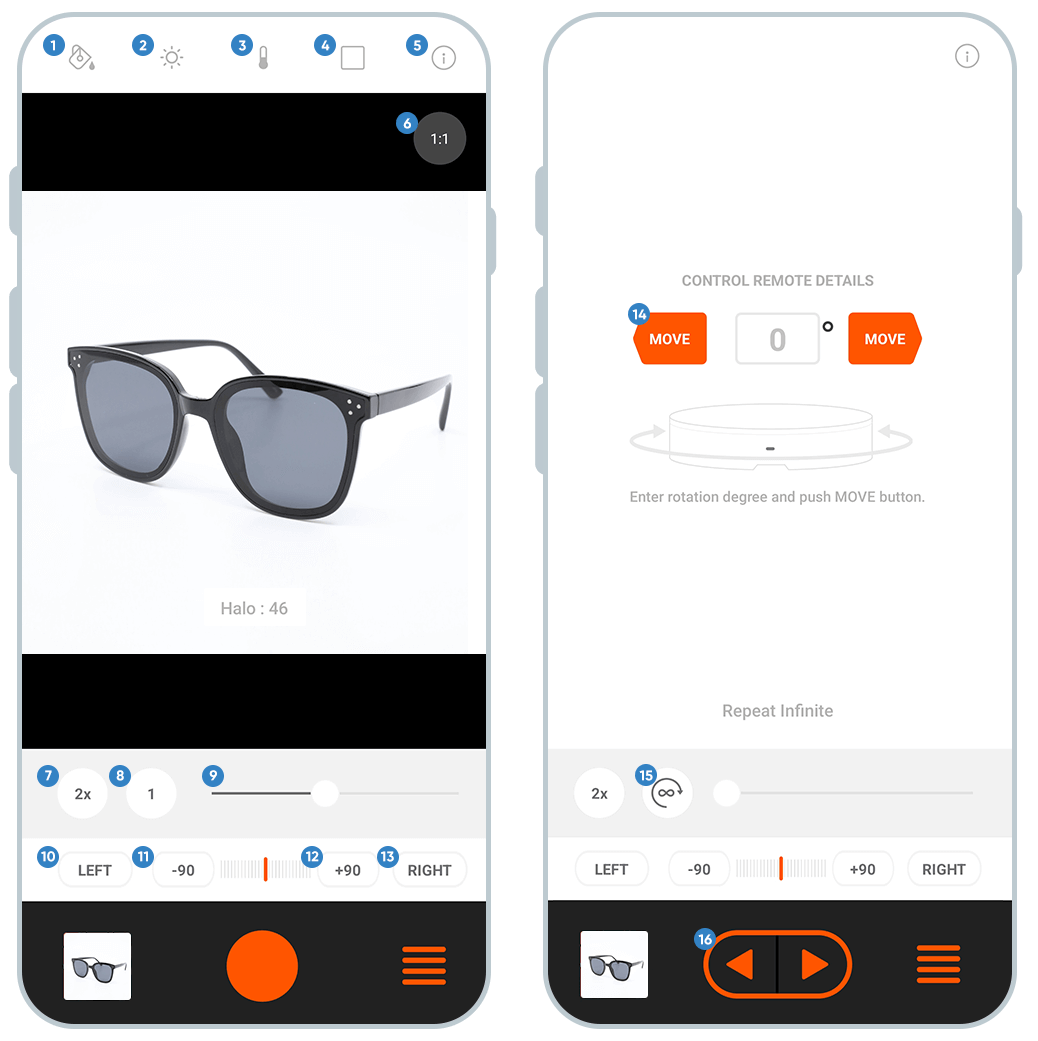
- Background Fill: Extract the outline of the object and fill background with a pure white background.
- Exposure: Adjust the exposure to achieve the best lighting for your products.
- Color: Change the color temperature of your photos.
- Grid: Choose from line, circle, and horizontal grid to help position the elements in your photo.
- Info: All feature’s info
- Ratio: Set the image/video ratio to 1:1 or 3:4.
- Speed: Set the speed of the smart turntable to 1x, 2x, or 3x.
- Frame: Set the number of frames to create 360° images. Choose from 24, 36 or 48 frames.
- Halo Edge: Control the Halo Edge light brightness.
- Direction Left: Rotate the turntable clockwise manually.
- Rotation -90: Button to rotate the smart turntable 90° counterclockwise.
- Direction Right: Rotate the turntable counterclockwise manually.
- Rotation +90: Button to rotate the smart turntable 90° clockwise.
- Specific Movement: Input the specific degrees you want to rotate the turntable.
- Rotation Type: One time rotation / Continuous rotation
- Rotation Button: Rotate the turntable depending on the rotation type.
-
360-degree images can be saved as JPG, GIF, and MP4 format. You can also export all data as a zip file.
-
Make sure you are using a compatible camera (if you are trying to shoot automatic 360 photos with your DSLR). Check the compatibility list here.


Make sure the IR receiver on your camera is facing the turntable’s IR transmitter (blue flashing light) and there are no obstacles in between the camera and Foldio360/Foldio360 Smart Dome.

Lastly, select the other option for your camera brand on the app. For example, if you have already tried CANON-1, try CANON-2 and click connection test. If you still have issues, please contact us directly.
-
It means that the image processing speed of your camera is slower than the Foldio360’s rotation speed. In other words, it means communication failed, because the Foldio360 keeps rotating and sending IR signals while the camera is processing the previous images.
In this case, you can adjust some factors to improve the image process speed of your camera or increase the IR remote delay time on the foldio360 app.
Camera Lens Focus
Change the lens Focus mode from AF to MF.
Settings → DSLR → IR remote delay (Increase delay time to 2 seconds maximum)
IR remote delay function slows down the IR signal sending and rotation speed to allow your camera have a time for the previous image processing.

Foldio360 Turntable Rotation Speed
Lower the rotation speed.

Image Data Size
Decrease the image data size on your camera menu. 5MB data size or S1 size setting would be good. It will also help to decrease the image processing time.
-
Yes, you can achieve Chromakey using a green backdrop (part of Foldio2 Plus Extra Backdrop set or any green backdrop) with the Foldio iOS application. *Chromakey function not offered with foldio360 app / Foldio App only available for iOS.
-
[iPhone]
OS version: iOS 10.0 or higher
Supported devices:
- iPhone 13
- iPhone 13 mini
- iPhone 13 Pro
- iPhone 13 Pro Max
- iPhone 12
- iPhone 12 mini
- iPhone 12 Pro
- iPhone 12 Pro Max
- iPhone 11
- iPhone 11 Pro
- iPhone 11 Pro Max
- iPhone XS
- iPhone XS Max
- iPhone XR
- iPhone X
- iPhone 8
- iPhone 8 Plus
- iPhone 7
- iPhone 7 Plus
- iPhone 6s
- iPhone 6s Plus
- iPad, iPod touch, Mac (M1 chip): This application is not guaranteed to operate on these devices.
[Android]
Android version: android 10.0 or higher
*Note: Android devices launched in the past 2 years that meet android version requirement should be compatible with the app.
-
foldio360 Control
-
Yes! Foldio360 Control is an application that controls the turntable via Bluetooth. Therefore, it is necessary to connect the computer and the turntable device via Bluetooth. Make sure that your computer’s Bluetooth is enable before connecting your turntable.
-
Supported devices: Foldio360 Smart Turntable & Foldio360 Smart Dome
-
Yes! You can rotate the turntable indefinitely through the Basic Controls section or the Control Tab in the application. Please refer to the user guide for more information.
-
Yes! You can control the brightness, color temperature, and the center point indicator light from the DSLR Tab of the application.
-
Please refer to the troubleshooting guide in the user manual.
-
First, make sure that your camera brand is either Canon, Nikon, Pentax, or Sony. Next, check the compatibility list to see if you camera is compatible with the turntable.
Click here to checkcompatibility list
Lastly, please refer to the troubleshooting guide in the user manual and contact our support team if you need any additional help.
-
Please refer to the troubleshooting guide in the user manual.
-
foldio360 Edit
-
OS: OSX 11 or higher (big Sur)
CPU: M1/i7 or higher
RAM: 8GB or higher
-
We recommend users to import a maximum of 100 images. The application may crash when over 100 images are imported.
-
Before importing the images, make sure that the image files are ordered. You can do this by opening the file -> clicking on the “Name” column to sort by name.
The imported image files are located in the Project Tree (on the left section of the application window). You can right click on the image file to move up and down.
-
Yes! By right clicking on an image in the Project Tree (located on the left section of the application window), you can perform various actions such as: delete, move up or down, import images above or below, export selected image, and copy or paste filter.

-
You can export the 360 image in GIF, JPG, PNG, and MP4 file format.
-
The level graph shows the selected image’s rgb level. Similar to the levels features of other editing tools, more values on the left show a higher ratio of black and more values on the right show a higher ratio of white. The level will adjust accordingly to the applied filters. To create a white background for your images, we recommend users to adjust the exposure level until the graph is all the way to the right.

-
This filter forcibly changes the pixels that are brighter than the set color value to white. Use this filter to remove shadows or change the dark areas in the background to pure white. If the border between the image and the background is not clear, the area around the border may become fuzzy. Also, if the object itself has any white or bright areas, applying the filter can brighten those areas to the point where they become pure white. It is highly recommended to apply only a small amount of the filter, according to the situation and object.
-
You can use this function to change the image viewer background to black or white. Use this as a reference to adjust your filter levels to create a pure white or black background for your images.

-
SPINZAM
SPINZAM is an interactive 360 image viewer platform where you can create interactive 360° images (rotatable with your finger or mouse) and host them to share on your websites. Once the image is uploaded, an iframe code is generated, which you can copy and paste onto your website to embed the interactive image into it. You can use SPINZAM after taking 360° images with the foldio360 application or your DSLR camera.
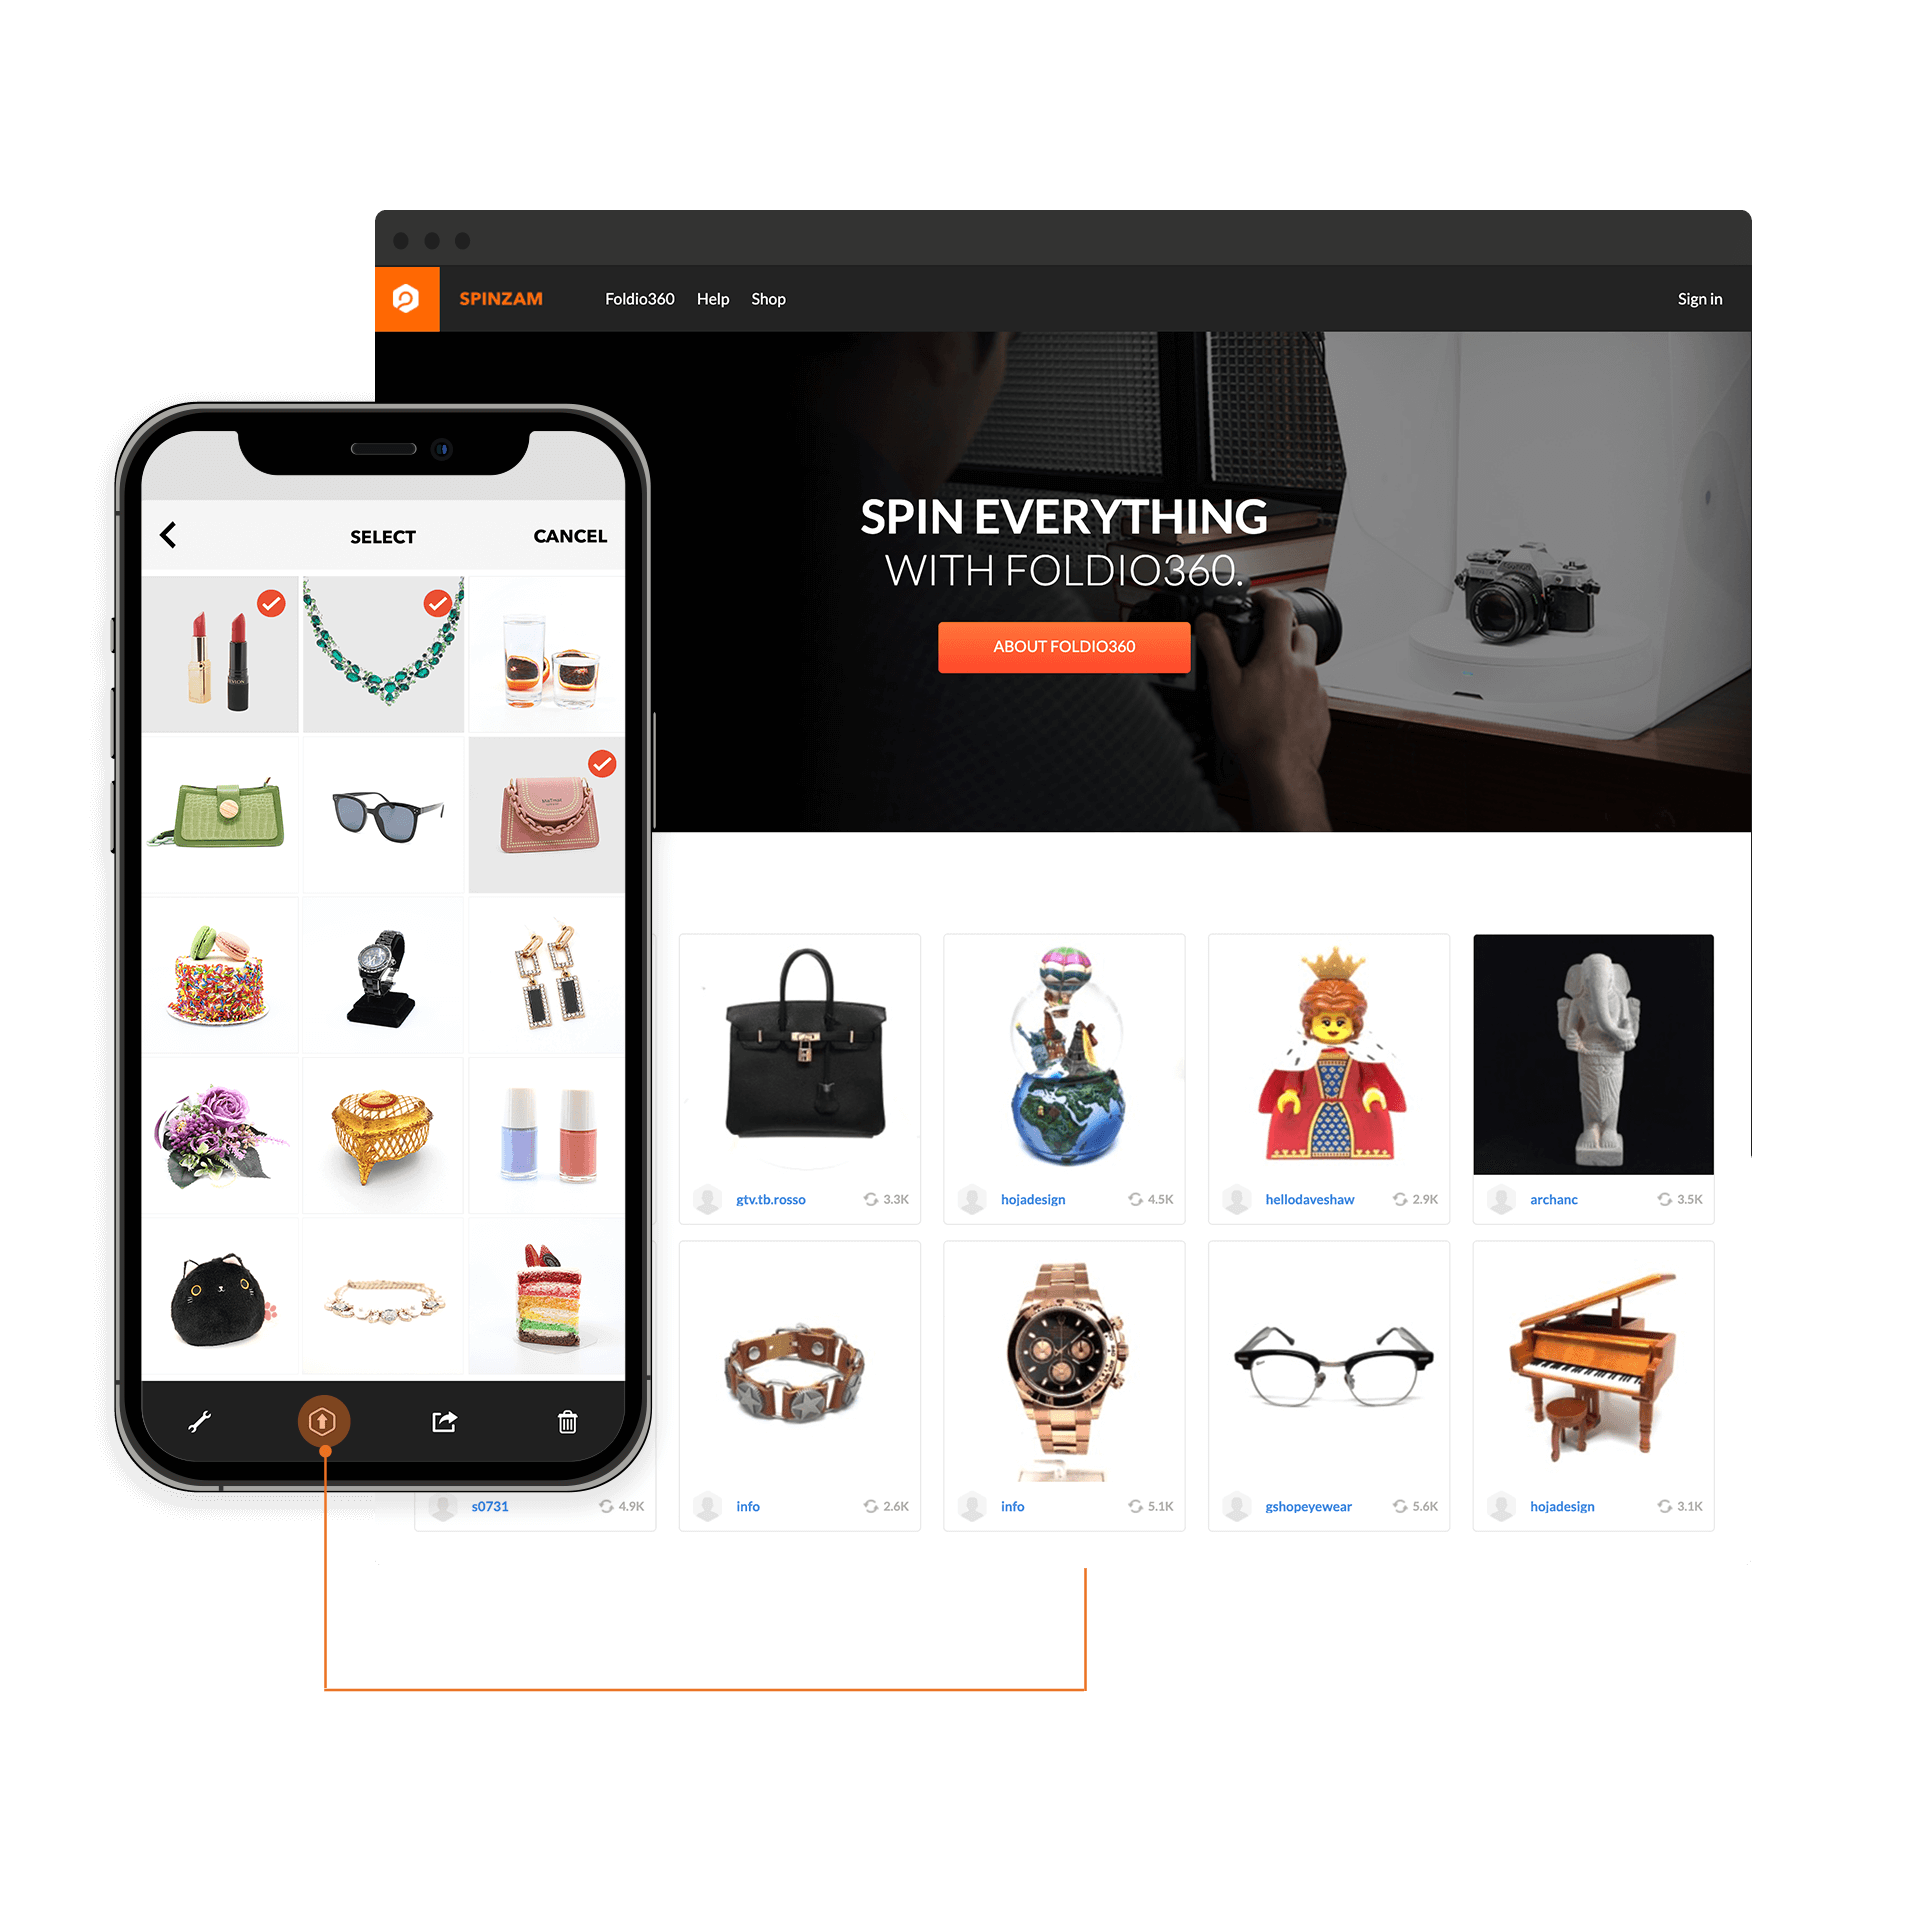
- Stores and hosts your images to use it on your website.
- Allows you to manage your images on My page.
- Creates a unique code to embed the 360° images.
- Easy to share the 360° images to social media platforms.
- Creates the interactive 360 image from the image sources of a DSLR camera.
Why SPINZAM?
- Take photos with your Foldio360 turntable/Foldio360 Smart Dome and foldio360 application
- Upload your 360 image to SPINZAM directly from Foldio360 image gallery
- Embed & Share
How to Use
From a smartphone
- Take photos with Foldio360 turntable and your camera
- Visit SPINZAM website and upload the image sources to SPINZAM from your camera memory card
- Edit and Save
- Embed & Share
From a DSLR camera
More information: Please visit SPINZAM Helpcenter
-
SPINZAM is currently free for Foldio360 users and provides three functions: upload, share, and generate iframe code.
-
The interactive 360 image does not have a specific file format as it is a series of JPG files programmed to be shown in a 360 degree view. You can export each fame image sources as a JPG and the 360° images as a GIF or MP4 files from the foldio360 app after taking photos with your smartphone in the PHONE 360 mode.
-
If you want to display the 360° images directly on your website, you first need to check if your website allows embedding iframe code on HTML editing mode. Some of the website providers currently do not allow iframe codes on their websites according to their own policy. Please check with your website policy before applying the 360 image iframe code to your website.
-
SPINZAM currently only provides 640 x 640 resolution for 360° images. If you want to create higher resolution 360° images with your smartphone, please export the image sources from the foldio360 app onto a third party 360 image viewer platform. Or you can use a DSLR camera to create higher resolution image sources.
-
Please visit this link: HOW TO UPLOAD THE 360 IMAGE FROM MY SMARTPHONE TO SPINZAM
-
Please visit this link: UPLOAD TO YOUR WEBSITE
-
Please visit this link: MORE INFO